My local co-op gallery is working on a new website, thanks to
Melanie Heinrich, inter-disciplinary artist who specializes in granite and stone, photography, and graphic design. She graciously offered to rebuild the website, and I volunteered to provide some of the content and edit the entire entity. YIKES! Since we are a gallery of 18 OTHER artists, our work largely depends on the submissions of others (content and photos). To that end, Melanie offered to do a photography workshop in an attempt to get quality, consistency, and "professional" photos to represent our work.
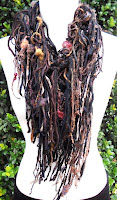
 |
| BEFORE |
Although we are all skilled at our various craft, we are at various stages of photography adeptness, knowledge of our cameras, and staging, and some of our work lends itself better than others to the camera. Mine, for example, requires the use of a mannequin or bust to properly display the work. A light box! Sure, that would be great, but it would require a HUGE tent to accommodate my standing mannequin. And since I am a fairly prolific producer of knitted, crocheted, and felted pieces, it really would require a ROOM to keep the tent and set-up ready and available just about every day. Well.....I just don't have that kind of space in my home to allow any photography "studio" to remain in place all the time.
 |
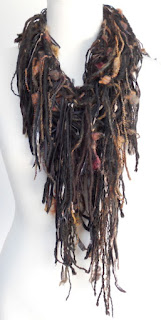
| AFTER |
So.......in the workshop I learned about the use of back-drops, photo "sweeps" and other tricks of the trade. Sweeps, lighting, camera settings - all these are important to the professional quality of the photos. I had been taking my photos outdoors (good!) in daylight (good!) with a lovely Carolina Jasmine or Podicarpus (not so good!) behind the mannequin. In most cases, I was able to crop the photos so that the background was fairly consistently GREEN (not so bad, but also not so good!). I had no clue about the settings on my camera, and now I do (thanks, Melanie!)
 |
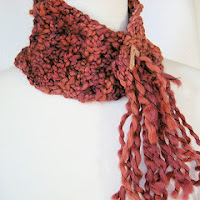
| BEFORE |
There are different ways to achieve the "look" using a sweep. One is to buy photographic paper backdrops. This comes in sheets or rolls. I'd need a roll and a way to adhere it to the wall, or in my case, brick. I'd learned that daylight is good, cloudy is better than sunny, but that my camera can be adjusted to each type of lighting. WOW!!! I never knew how to do that before! The best place for photographing my work - that could accommodate the mannequin AND provide the right type of light - without the purchase of special lights (that would also require a way to mount them!) - was in the alcove by my front door, either early in the morning or later in the afternoon, once the sun is no longer streaming into the space.
 |
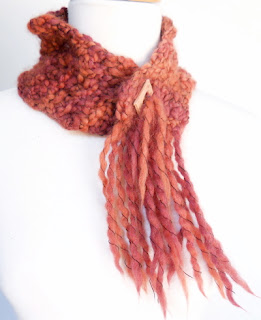
| AFTER |
The second suggestion for a "sweep" was a piece of white or light-colored laminate - that comes in 4' x 8' sheets. On my way home from the workshop, I stopped at Lowe's to see what they had and to price it. They did have a matte white sheet - but it was $42. I nixed that idea immediately and went home to research the photo paper sweep. What I found was lovely choices in paper color available in rolls that cost even more than the laminate. And paper creases and tears and would still have to be adhered to the brick in some way. Plus....it would be consumed over time.
So I sent my husband back to Lowe's to buy the laminate, thinking I could try it, and if it didn't work, I could return the thing. He took my station wagon and returned with this huge rolled up and taped sheet. I cut the tape and this MONSTER emerged! It seemed to have a life of its own! DH disappeared, of course, and I was left to tame the monster. My idea was to place it in the alcove, wedged between the front door and the brick side wall, bending gracefully at the floor to provide a white ground for mannequin. AND it was my intention to have a portable photo studio that could easily be set up and removed as needed. The concept was perfect; the execution was flawed!
 |
| BEFORE - Not too bad! |
This MONSTER piece of laminate with a mind of its own was not easily tamed! I managed to place it in the alcove with great effort AND many cuts and bruises to my legs and feet. The photos were terrific! the body was not! And then of course, I couldn't leave it there. It needed to be stored somewhere so we could have access to our front door. I tried re-rolling it, taping it - no use. We (yes, I finally enlisted the help of my husband!) tried bungie cord, rope, NOTHING would tame this thing! And even if we had, we had no clue where it could be stored. THIS was NOT going to work!
 |
| AFTER - Better! |
But finally, we found that keeping it flat, it could be stored against a wall in the garage and easily (ha!) pulled out for use. But ultimately, I realized that it was just too large and too unmanageable to be effective and efficient. I called Lowe's to see if I could bring it in to be cut down. No, they don't do that! I figured that cutting 2 feet off the end would still work and be far more manageable!
So the next big deal was to try to cut it down myself. The Lowe's guy said it could be cut with a utility or Exacto knife and a straight edge. DH was golfing, so visiting daughter agreed to help me. I sought out the proper tools (we actually had everything!) and we set to work. I could barely make a scratch in the surface. So now....I had to wait for my husband. I wanted to be able to do this without his help, because he's on blood thinners, and so I'm reluctant to have him messing around with knives and other sharp objects (like monster laminate!)
But.....HE DID IT!!!! No bleeding (other than my earlier cuts and scrapes). The results were TWO pieces of laminate, one that's 4' x 6' and the other that's 4' x 2'. I could now place the larger piece wedged in the alcove as planned and use the smaller one on the floor to provide additional light. I don't need it to sweep because my pieces are photographed from the hips up. OMG!! IT WORKS!!! I need only show you some of the new photos and, where possible, some before and afters! Actually, if you look at the "Slideshow" at the top of this blog, you'll see many of the new photos. ENJOY!
I promise (NEXT TIME it's set up!) to take photos of the set-up BEFORE taking any photos! Still working on my photos for the website - but I am on my way!


1 comment:
I think you should just have given up on the 'using the front door' idea. You have a back door? So use it! Ha ha just joking. I desperately need a better way to photograph my stuff so I am going to mull over this post.
Post a Comment